The LEGO pneumatics system is what actually lured me back into the hobby. As most adult LEGO enthusiasts, I have gone through a period we like to call The Dark Ages. Aged about 15, I left LEGO for what it was, or what many people think it is, which is a kids toy. As a salute, the last LEGO model I built before I entered my Dark Ages, was this articulated Wheeled Lizard.
In 1995, over ten years ago when I write this, my girl friend and I were visiting a city while on a vacation in our country. Casually looking around in a toy store, my eye was caught by a rack of LEGO Service sets, including some seperate pneumatic pumps, tubes, valves and cylinders. I was fascinated.
These had not been available before my Dark Ages, but I had seen similar items in the Fischertechnik system. While Fischer generally doesn't offer the detail and good looks of LEGO models, I always respected the construction system for its bold, technology driven development. It offered pneumatics, radio control, solar energy, electronic control, all ages before The LEGO Group did. But it was utterly expensive and mostly used in education.
So there I was, looking awestruck at the pneumatic system which LEGO had developed in the mean time. With a mix of curiosity and nostalgia I bought the seperate components, which I would be able to use with the old LEGO parts I had kept at home.
On the train home, I immediately opened the bags, connected the cylinders and tubes and was childishly fascinated by the functioning. All this in plain view, to some embarassment of my girlfriend. Fortunately she is still with me to this present day.
Pneumatics in Technic sets
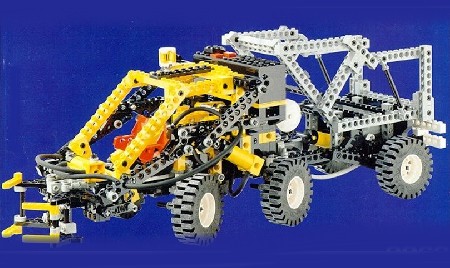
In 1992 the pneumatic system culminated in what is widely considered to be one of the best LEGO Technic sets ever: the 8868 Air Tech Claw Rig. The main model consisted of a crane on the back of a truck. Besides a wholesome truck with working steering and engine pistons, the model included a motor driven pneumatic pump and 5 working cylinders to move the crane. Even the turntable of the crane was powered by pneumatic cylinders.
The alternative model of the same set is mechanically unique in LEGO history as well. After I built the main model, I was so pleased with it that I never took it apart. But while I studied the instructions for the alternative model, I got the impression something was peculiar about them. Carefully tracing the intricate mingle of tubes it gradually occured to me. The pneumatic movement controlled the valves and vice versa, resulting in a repetitive movement of the vehicles arms going up and down, without any outside control except providing constant pressure.
This clever principle inspired me to read some interesting books about industrial pneumatic control logic. Also, I described the principle on this web site, because I felt this widely applicable technique shouldn't be buried in one single inconspicious alternate model in LEGO history. I'm pleased it was picked up by some of the talented LEGO enthusiasts, who have taken LEGO pneumatic control to superb levels.
First generation pneumatics
In fact, my first pneumatics parts were of a second generation system. To properly appreciate LEGO pneumatics, let's have a closer look at how the first system from 1985 worked.
The system follows from a dual-action pump cylinder. If you push down, it forces the air out. If you release, a spring around the piston will push it back up, thus sucking the air back in. If directly connected to a working cylinder, the working cylinder would go up and down, but only with very little force.
To add subsequent pushes on the pump into the working cylinder, a valve is needed. A special LEGO brick with an automatic valve inside. When the pump supplies alternating air pressure and suction to the center tube connector, the air is forced out to one tube connector and sucked in trough the other. So together, the pump and valve move air from the inlet of the brick to the outlet of the brick. It produces air push at one side and air pull at the other side.
If a working cylinder were directly connected to the automatic valve brick, it would extend and be firmly filled by subsequent pushes of the pump. But after work is done, we need a way to release the air from the working cylinder so it can restore its original position.
So to control the circuit, a manual valve is added. In one position, the manual valve connects the air push to the working cylinder. In another position, the manual valve connects the air pull to the working cylinder. In both positions, the opposite connector is opened to the outside air, releasing pressure. A middle position keeps the circuit fixed.
Why change the system?
The first pneumatics system had some strenghts. Using both pressure and suction, less pump movements were needed. Also the pump cylinder could be produced as identical to the working cylinder, except for a spring. If you take out the springs of spare pumps, you'll have some more working cylinders. Also, the automatic valve brick is useful in advanced pneumatic circuitry.
The system had a built in limitation however. The pressure of human hands pushing down a pump is abundant. But the strength of the spring, pushing the pump back up, limits the suction power and therefore the power of the whole system. In models, it was not suction but simply the weight of the moving structure, such as a crane arm, that pushed the piston back in. For powerful applications, stronger pneumatics were needed.
Second generation pneumatics
The newer system from 1989 follows from a one-way pump, producing pressure only. For convenience, the spring pushes the piston back up, but without any suction action. If directly connected to a working cylinder, the working cylinder would only go up, even with multiple pumping movements.
To move working cylinders back down, pressure must be applied from the upper side of the piston, while air is released from the lower side. Therefore cylinders now offered tube connectors on both sides of the piston!
The existing manual valve now was used to lead the pressure to either the upper or to the lower chamber of the working cylinder, while releasing air from the other chamber. The need for the automatic valve brick was eliminated because the system now only applied pressure. Effective force was now only limited to the tubes jumping off their connections; by now a welcome safety feature.
Later changes
An airtank was later added to the system, so one can pump up a supply of compressed air, allowing for a couple of pneumatic actions without pumping. This is of limited efficiency however, because the manual valve releases air from one chamber of the cylinder on each action. When pressure in the tank is pumped up high, more air will be used up on each action. Using multiple tanks is more efficient, since you can have more pressurized air available at a lower pressure level.
The outsides of pumps, cylinders and valves were later redesigned to better fit in structures of studless Technic beams. But they were still compatible with the existing parts.
High or low?
As you will have noticed, I definitely consider Pneumatics as a High in the LEGO system. It's a versatile, interesting and utterly cool way of moving structures. And much to the designers' credit, there was a principal change in the system, while old and new parts can still be mixed if you understand the principles.
The only thing to regret, is that LEGO never produced a solenoid valve for electronic or even computer control of pneumatics. Needless to say, Fischertechnik did.


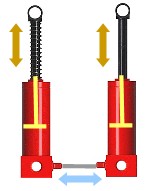 The system follows from a dual-action pump cylinder. If you push down, it forces the air out. If you release, a spring around the piston will push it back up, thus sucking the air back in. If directly connected to a working cylinder, the working cylinder would go up and down, but only with very little force.
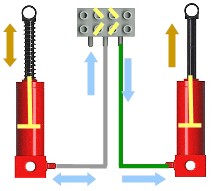 To add subsequent pushes on the pump into the working cylinder, a valve is needed. A special LEGO brick with an automatic valve inside. When the pump supplies alternating air pressure and suction to the center tube connector, the air is forced out to one tube connector and sucked in trough the other. So together, the pump and valve move air from the inlet of the brick to the outlet of the brick. It produces air push at one side and air pull at the other side.
  So to control the circuit, a manual valve is added. In one position, the manual valve connects the air push to the working cylinder. In another position, the manual valve connects the air pull to the working cylinder. In both positions, the opposite connector is opened to the outside air, releasing pressure. A middle position keeps the circuit fixed.
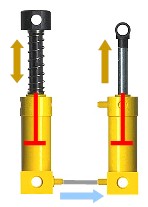 The newer system from 1989 follows from a one-way pump, producing pressure only. For convenience, the spring pushes the piston back up, but without any suction action. If directly connected to a working cylinder, the working cylinder would only go up, even with multiple pumping movements.
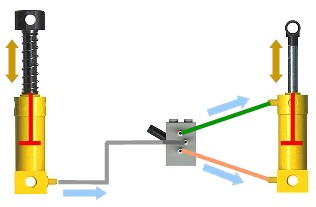 To move working cylinders back down, pressure must be applied from the upper side of the piston, while air is released from the lower side. Therefore cylinders now offered tube connectors on both sides of the piston!